

How To Repair Stone Wall On House
Larn the fine art of dry stone walling…
Building with dry stone is one of the earliest skills developed by humans. Dry stone walls are durable because they contain no mortar, just are held together by the weight of rock, and by the skill of the architect who selected and fitted the stones together.
Dry rock walling involves either stripping and rebuilding existing walls that have fallen into disrepair, or gapping – repairing gaps where the wall has collapsed. Fewer new walls are built, although foundations sometimes take to be relaid.
Allow'due south expect at the techniques.
Easily-on techniques for building a dry stone wall
Stripping out
Sort out the coping stones from the complanate wall offset and place them two to 3 metres from the wall.
Have out the principal stones and put the meridian ones furthest from the wall. Keep the largest ones nearest the wall to aid building. Get out a gap of about 60cm alongside the wall for working. Proceed throughstones prophylactic and separate.
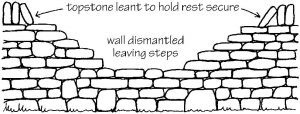
When stripping out a gap, step the ends to tie in the new wall.
Batter frames
Batter frames are used to ensure accurate work.

Set the frame(due south) at the end(south) of the section yous are working on and run guidelines forth the wall. Make sure the lines aren't moved by people working.
Foundations
The foundations or footings should be set in a trench a few centimetres wider than the wall, dug downwards to a firm base of operations. They could be as little as 3cm upwards to 30cm deep depending on soil type.
Use the biggest stones, except those that are practiced for coping, wallheads or throughstones.
Place the long edges into the wall whenever possible.

Stones should be steady and unable to slip. Don't use ones that need wedging. Avert roundbacked stones that are hard to build on.
Pack between the footings with angular, freedraining hearting stones.
Courses
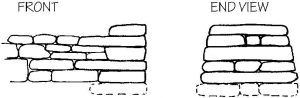
The wall is built up in horizontal courses (lines of stones of even tiptop) for ease of construction, strength and advent.
Use the biggest stones in the lesser of the wall and the smallest in the tiptop. This produces a stronger wall and is easier to build.
Endeavour to ensure that each joint in ane course is bridged by a stone in the next course.
Place stones level or dipping outwards slightly and where possible with the long edge into the wall.
Hearting stones are important. Use solid angular stones. Place them advisedly, almost as you would the face stones. Add together hearting stones as y'all go, keeping them at or just below the level of the confront stones.
Make sure people follow the designated batter of the wall. Attempt to go along the face of the wall smooth – it discourages climbers.
Identify stones on the wall – don't drop them and don't hammer on the wall otherwise you will dislodge other stones.

Throughstones
Throughstones located at regular intervals straddle the wall, belongings the two sides together to stop it bellying out and collapsing. They are essential for the wall's strength. They tin exist slightly longer than the wall's width, but must not exist shorter as this makes the wall less secure. Ensure that they pin all the stones beneath them. How many to utilise and where to put them depends on the regional style of wall and the blazon of stone.
Coping
Coping stones straddle the wall in the same way as throughstones, holding the sides together and belongings downwardly and protecting the upper courses.
There are many types of coping, so follow the local mode equally far as possible. Keep the top of the coping even past using a line. Avert wedging the stones to keep them steady.
Wallheads
The wall head is a pillar which acts like a bookend to hold the wall up. It is the department least well supported and almost prone to damage. Use the largest and most rectangular stones available.
Slopes
Build in horizontal courses. Class the courses and then that the biggest stones are nearly the hillside, merely keep the class as level as possible. Start from the bottom and work uphill.

Gapping
Remove and sort all the unstable stones so that yous take a firm base of operations to work from. Sort the coping stones out start.
Step the ends of the gap so that you tin tie in the new wall.
Expect at the old wall to run into how it was built and try to recreate its style. Use the one-time stone for rebuilding – don't clean off old moss and vegetation and ensure whatsoever additional stone used is of the same type as the original.
Season
Generally spring and summer because information technology is hard to stay warm in walling in cold weather.
Grooming and working with groups
Site visit
Visit the work site in accelerate to gain a clear thought of what you lot volition be doing on the mean solar day. If working for a client, encounter with them on site to discuss the projection. Assess the suitability of the projection for the group you lot will be leading and the fourth dimension available.
Consider the following questions: What resources are required for the projection and who volition supply and deliver them? Are there any admission difficulties? Consult plans or drawings to establish the location of underground services.
Undertake a adventure assessment for both project and site.
Tools & equipment
Depending on the size of the team adapt the quantity of equipment taken to site. Ensure the tools are in good condition before using them.
Here is a list of the tools and equipment you might need:
- First help kit
- Appropriate protective gloves
- Touch grade goggles
- Tape measure
- Lines and pegs
- Line and spirit level
- Fencing pliers
- Concoction frame (already made according to wall specifications)
- Walling, sledge, club and claw hammers
- Chisels (including eternalize chisels)
- Garden spades
- Crowbar
- Mattocks
- Buckets
- Wheelbarrows
- Bowsaws
- Site safe signs
Ensure all team members are wearing advisable footwear and clothing and upshot the specified safety equipment.
Introduce the site, the work and the reasons for doing information technology. Walk around the site explaining what piece of work will be undertaken. Identify potential hazards and explain how to work safely around them.
Demonstrate tool utilise
Demonstrate and explain the safe employ, carrying and on-site care of the tools before starting piece of work. Refer to the TCV Hand Tools booklet [available soon].
Demonstrate piece of work techniques
Demonstrate all new work techniques as you come to them. This volition salvage mistakes and avoid accidents.
Programme the motility of stone to avert lifting and to employ whellbarrows where possible.
Demonstrate the correct lifting technique (bending the genu and keeping the back direct then that the leg muscles are used and the dorsum is non strained).
Organisation of team
Talk about how a wall is built, show everyone an existing piece of wall, point out the details of construction and place and depict the regional fashion.
Divide the team into pairs, teaming beginners with experienced wallers. Allocate and mark a ii to three metre section of wall per pair, one person on either side. A grouping of 12 should be able to build around four to six metres of wall per day.
Leave some people costless to collect 'new' stone from surrounding site and ensure that the dissimilar types of stones are evenly distributed.
Stress the bones rules:
- Each stone should rest on two others and two should residuum on information technology.
- Where possible put the longest length of stone into the wall.
- Continue the courses level and build up both sides at the same rate.
- Proceed to the right batter.
- Course the wall – largest stones at the bottom, smallest at the top.
- Never hammer on the wall.
- Step back at regular intervals to see what the wall looks like.
- Always aim to encompass any joints.
- The leader should bank check, help and encourage people and ensure work standards are maintained.
Larn the fine art of dry stone walling, woodland management, afforestment, hedgelaying and much more.
Become instant access to the definitive 'how to' practical conservation guides. Advice, instructions and support to manage your countryside and green spaces.
Sign upwardly now
Source: https://www.conservationhandbooks.com/build-repair-dry-stone-wall/
0 Response to "How To Repair Stone Wall On House"
Post a Comment